This tutorial is a getting start to build OpenWRT image and install on Banana Pi R64, This guide also works with the Banana Pi R2 but it will be a difference in some steps.
What is Banana Pi R64
The Banana Pi R64 is a router-based development board running with ARM Chipset MediaTek MT7622. So you can install operating systems which support to this ARM CPU including OpenWrt, Ubuntu, or many Linux distributions. It has many interfaces support such as on board Wifi/Bluetooth, 1GB Ethernet, USB 3.0, 40 GPIO, etc. Banana Pi R64 can add a Mini-PCI Express Modules and PoE module. And It also has a performance, resource, and interfaces good enough to be a high-end router.
Banana Pi R64 Specifications
- MediaTek MT7622,1.35GHZ 64 bit dual-core ARM Cortex-A53
- 1G DDR3 SDRAM
- Mini PCIE interface support 4G module
- Built-in 4x4n 802.11n/Bluetooth 5.0 system-on-chip
- MTK7615 4x4ac wifi on board
- Support 1 SATA interface
- MicroSD slot supports up to 256GB expansion
- 8G eMMC flash (option 16/32/64G)
- 5 port 10/100/1000 Mb Ethernet port
- 1 Port USB 3.0
- Slow I/O:ADC, Audio Amplifier, GPIO, I2C, I2S, IR, PMIC I/F, PWM, RTC, SPI, UART
- POE function support
Requirements
- macOS (I used 10.15.3) *for Ubuntu, will easier to build the image
- Banana Pi R64
- MicroSD Card
- MicroSD Card Reader
- USB to UART
Preparation
Install USB to UART Driver
Just follow this link if you’re using FTDI
https://learn.sparkfun.com/tutorials/how-to-install-ftdi-drivers/all
here is for CP2102
https://www.silabs.com/products/development-tools/software/usb-to-uart-bridge-vcp-drivers
Terminal software for serial
you can use whatever serial console Putty, screen, minicom
for this tutorial I use screen
Download images
SD card image
https://drive.google.com/open?id=1Ap7lt-pjpG-pAOAEqpH13-SMOSkRkZI0
eMMC all-in-one single image
includes GPT, ATF, u-boot, and Linux kernel image
https://drive.google.com/open?id=1w8kO3klbPfdHK6lTI8Ub8sR_7ViISORM
eMMC preloader
https://drive.google.com/open?id=1Fy__GpNSWRcITEmzH4Z_jxnjrCS3BpQJ
Setup boot from eMMC
this step will allow you to build image to eMMC storage on the board instead sd card
Write SD card image into SD card
You need to boot via sd card first to write preloader and eMMC all-in-one single image
dd if=sdcardimage.img of=/dev/sdX
replace sdX with your drive
Run TFTP server
You can your system TFTP Server but for easy on and off the service so I use 3rd party TFTP Server.
TFTP server
you can download here http://ww2.unime.it/flr/tftpserver
MacOS build-in tftp (optional)
If you don’t like to install 3rd party software you can use system TFTP Service
sudo launchctl load -F /System/Library/LaunchDaemons/tftp.plist

sudo launchctl start com.apple.tftpd

cd /var/tftpboot touch # make initial tftp directory
Copy file to tftp folder
change mode your directory to allow other users to read and write files
chmod 777 /private/tftpboot
copy the binary file into TFTP root directory

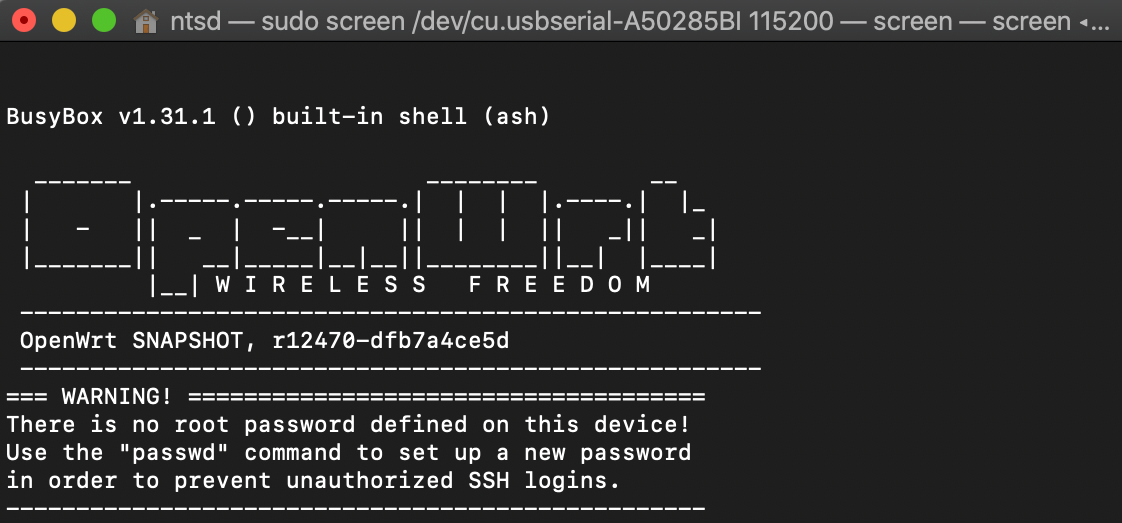
Connect to board by UART
use serial 115200 baud for Bananapi r64
sudo screen /dev/cu.usbserial-A50285BI 115200
replace cu.usbserial-A50285BI with your serial driver
Set u-boot env
setenv ipaddr 192.168.1.126 # your bpi ip address
setenv serverip 192.168.1.1 # your tfto server
setenv netmask 255.255.255.0
saveenv
[comment]: <> (load ROM to address 1080000)
[comment]: <> (tftp 1080000 preloader_emmc.bin)
check u-boot env
printenv
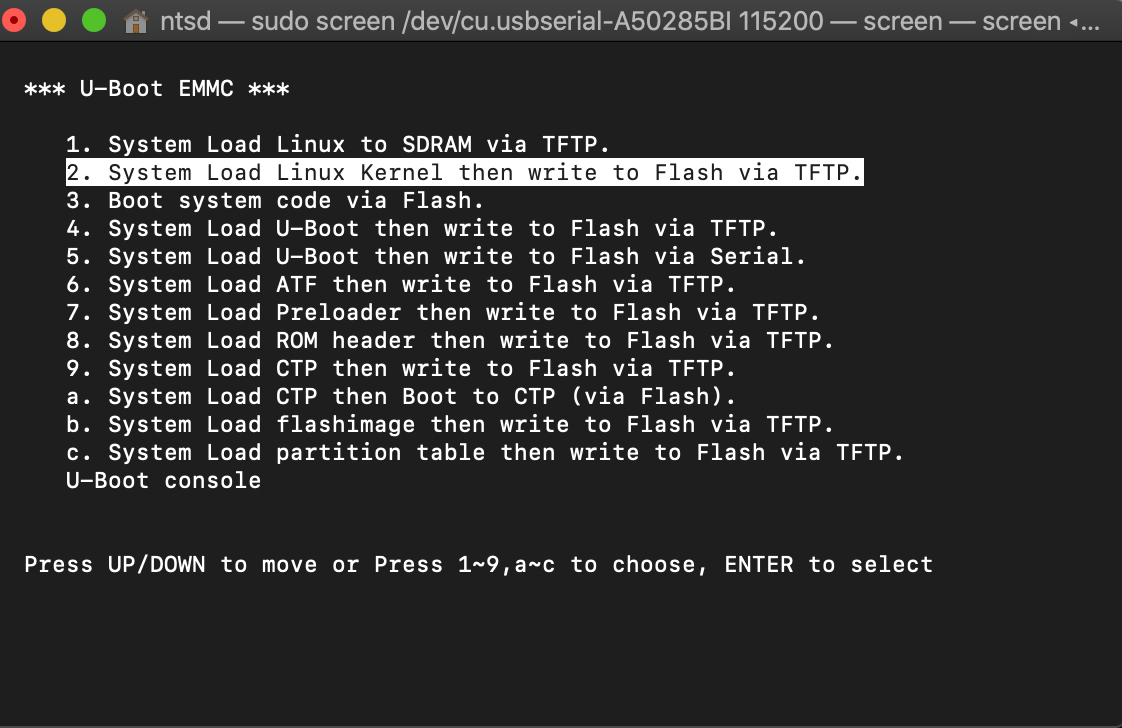
return to u-boot menu
bootmenu
Write eMMC image to flash via TFTP
Put Ethernet to WLAN port for connect to the router
make sure your TFTP server in the same network with your bpi board
Install eMMC flash image to flash
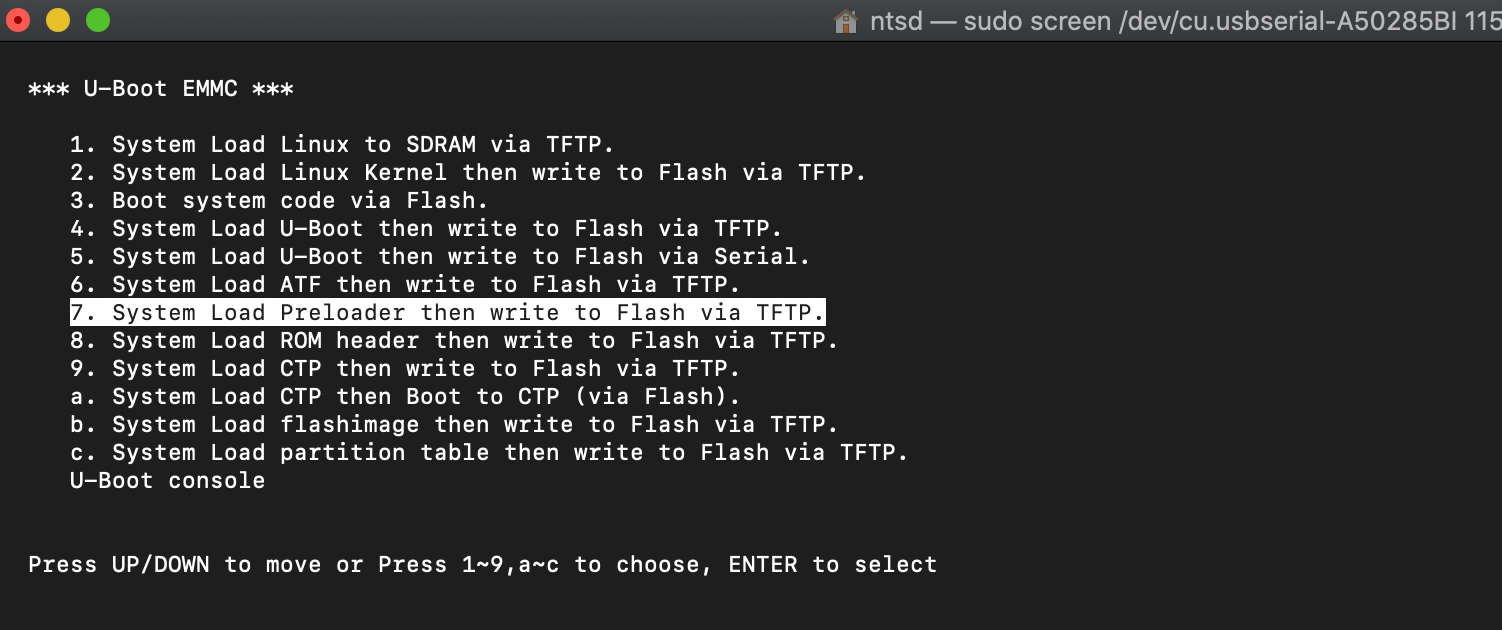
in u-boot menu choose “b. System Load flash image then write to Flash via TFTP”
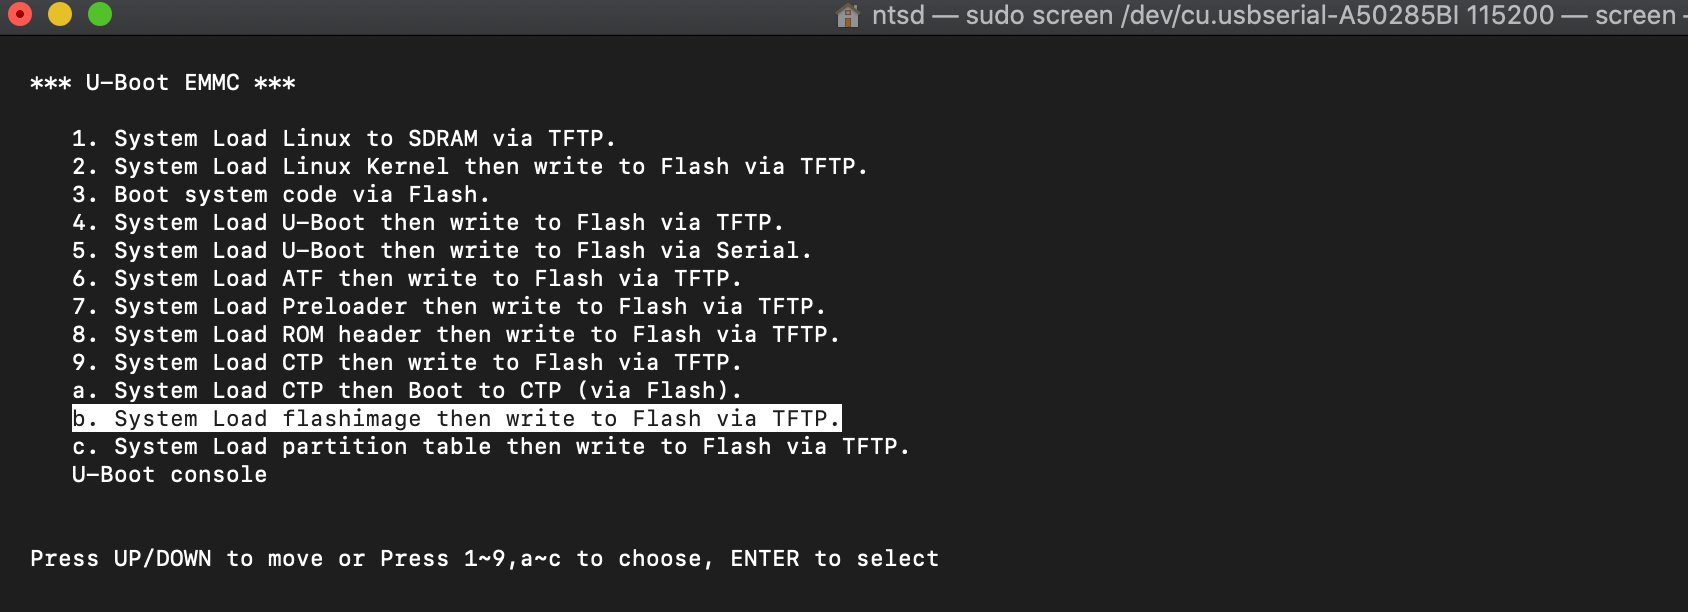
Set TFTP server IP and flash image file name

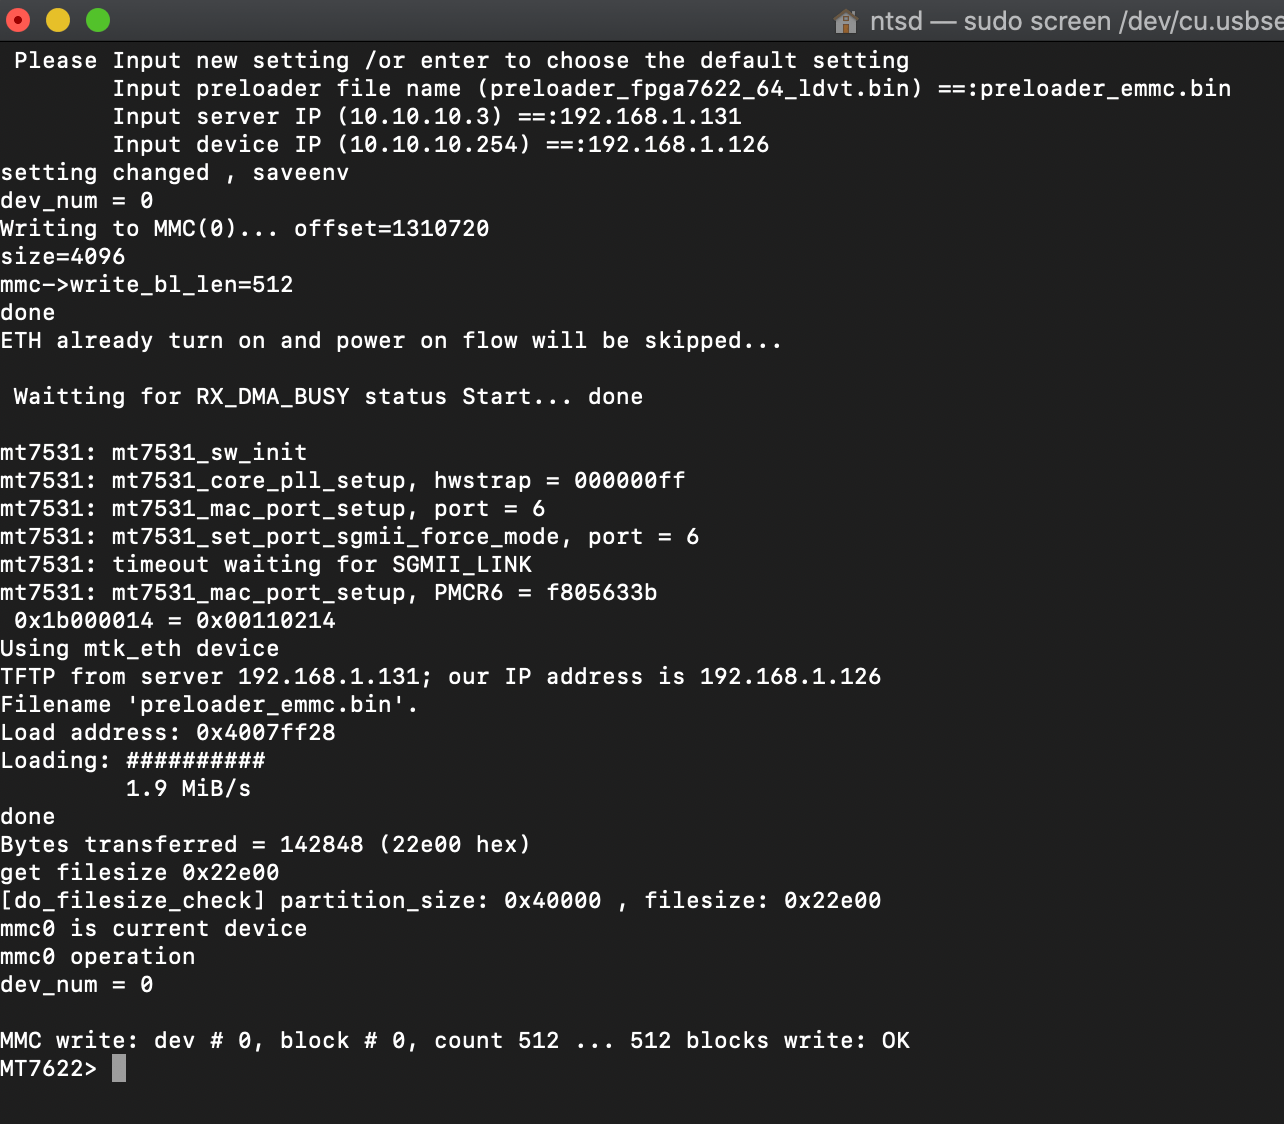
Install preloader to flash
back to U-Boot menu choose “7. System Load Preloader then write to Flash via TFTP”

Set TFTP server IP address and preloader file name
Remove sd card and power-off The Banana pi, Remove SD card, and Power on.
Now you’ll get U-BOOT installed on eMMC storage
Build your OpenWRT image
Preparation to build OpenWRT image
follow the link for more information https://openwrt.org/docs/guide-developer/buildroot.exigence.macosx
Setup MacOSX as an OpenWrt build environment
Install these package by Homebrew
brew install coreutils diffutils findutils gawk gnu-getopt gnu-tar grep wget quilt xz

# Link gnu-getopt to local gnugetopt
ln -s `brew --prefix gnu-getopt`/bin/getopt `brew --prefix`/bin/gnugetopt
add gnu-getopt to your path
export PATH="/usr/local/opt/gnu-getopt/bin:$PATH"
Create case-insensitive filesystem
OS X by default comes with a case-insensitive filesystem. OpenWrt won’t build on that. As a workaround, create a (Sparse) case-sensitive disk-image that you then mount in the finder and use as build directory
hdiutil create -size 20g -type SPARSE -fs "Case-sensitive HFS+" -volname OpenWrt OpenWrt.sparseimage

# mount the image
hdiutil attach OpenWrt.sparseimage
change directory to /Volumes/OpenWrt
cd /Volumes/OpenWrt
Build OpenWRT Image for MT7622
Clone OpenWRT project
git clone https://github.com/openwrt/openwrt.git
Set parametres
Target System: MediaTek Ralink ARM
Subtarget: MT7622
Target Profile: Banana Pi R64
cd openwrt

./scripts/feeds update -a
./scripts/feeds install -a

make menuconfig
Set config and include built-in dependency that you want (Luci is not included by default)
then save to .config
Build OpenWRT image
# for 10.15 need set deploy target it to 10.14
MACOSX_DEPLOYMENT_TARGET=10.14

# Start make
# vadd v1 mean verbose Level 1 (warnings/errors), level 99 (stdout+stderr)
# add -j4 mean use quard core
make -j4 V=1
Kernel image file will be at ./bin/targets/mediatek/mt7622/openwrt-mediatek-mt7622-bpi_bananapi-r64-initramfs-kernel.bin
Install OpenWRT Image to Bananapi via TFTP
Copy the kernel image to TFTP folder
cp ./bin/targets/mediatek/mt7622/openwrt-mediatek-mt7622-bpi_bananapi-r64-initramfs-kernel.bin /private/tftpboot/
Enter to the U-Boot menu
Install kernel image from TFTP
Finally, I got The OpenWRT image installed